1. Pre-Installation Site Assessment & Pull Testing
Before any groundwork begins, a detailed feasibility study and site survey must be conducted. Pull testing is a crucial part of this assessment, used to determine the soil’s ability to support the foundation piles. This involves applying force to test the strength and stability of the piles, ensuring they can withstand environmental stresses such as wind loads and soil movement. By conducting pull tests, engineers can select the most appropriate pile type and installation method, reducing the risk of future structural issues.
2. Laying Out the Site
Every successful solar installation starts with careful planning. The layout process involves assessing the terrain, optimising panel orientation for maximum sunlight exposure, and marking precise locations for foundation piles. This ensures efficient land use and the best possible energy yield from the system.
There are different layout configurations depending on site conditions and project requirements.
- Portrait vs Landscape Orientation – Solar panels can be mounted in either portrait (vertical) or landscape (horizontal) orientation. Landscape layouts often reduce shading issues and can improve wind resistance, whereas portrait layouts can allow for more efficient row spacing and installation.
- Single vs Twin Post Systems – A single post system is a cost-effective solution that requires less steel but may be less stable in challenging ground conditions. A twin post system provides additional support and durability, making it ideal for large-scale commercial projects or areas prone to high wind loads.
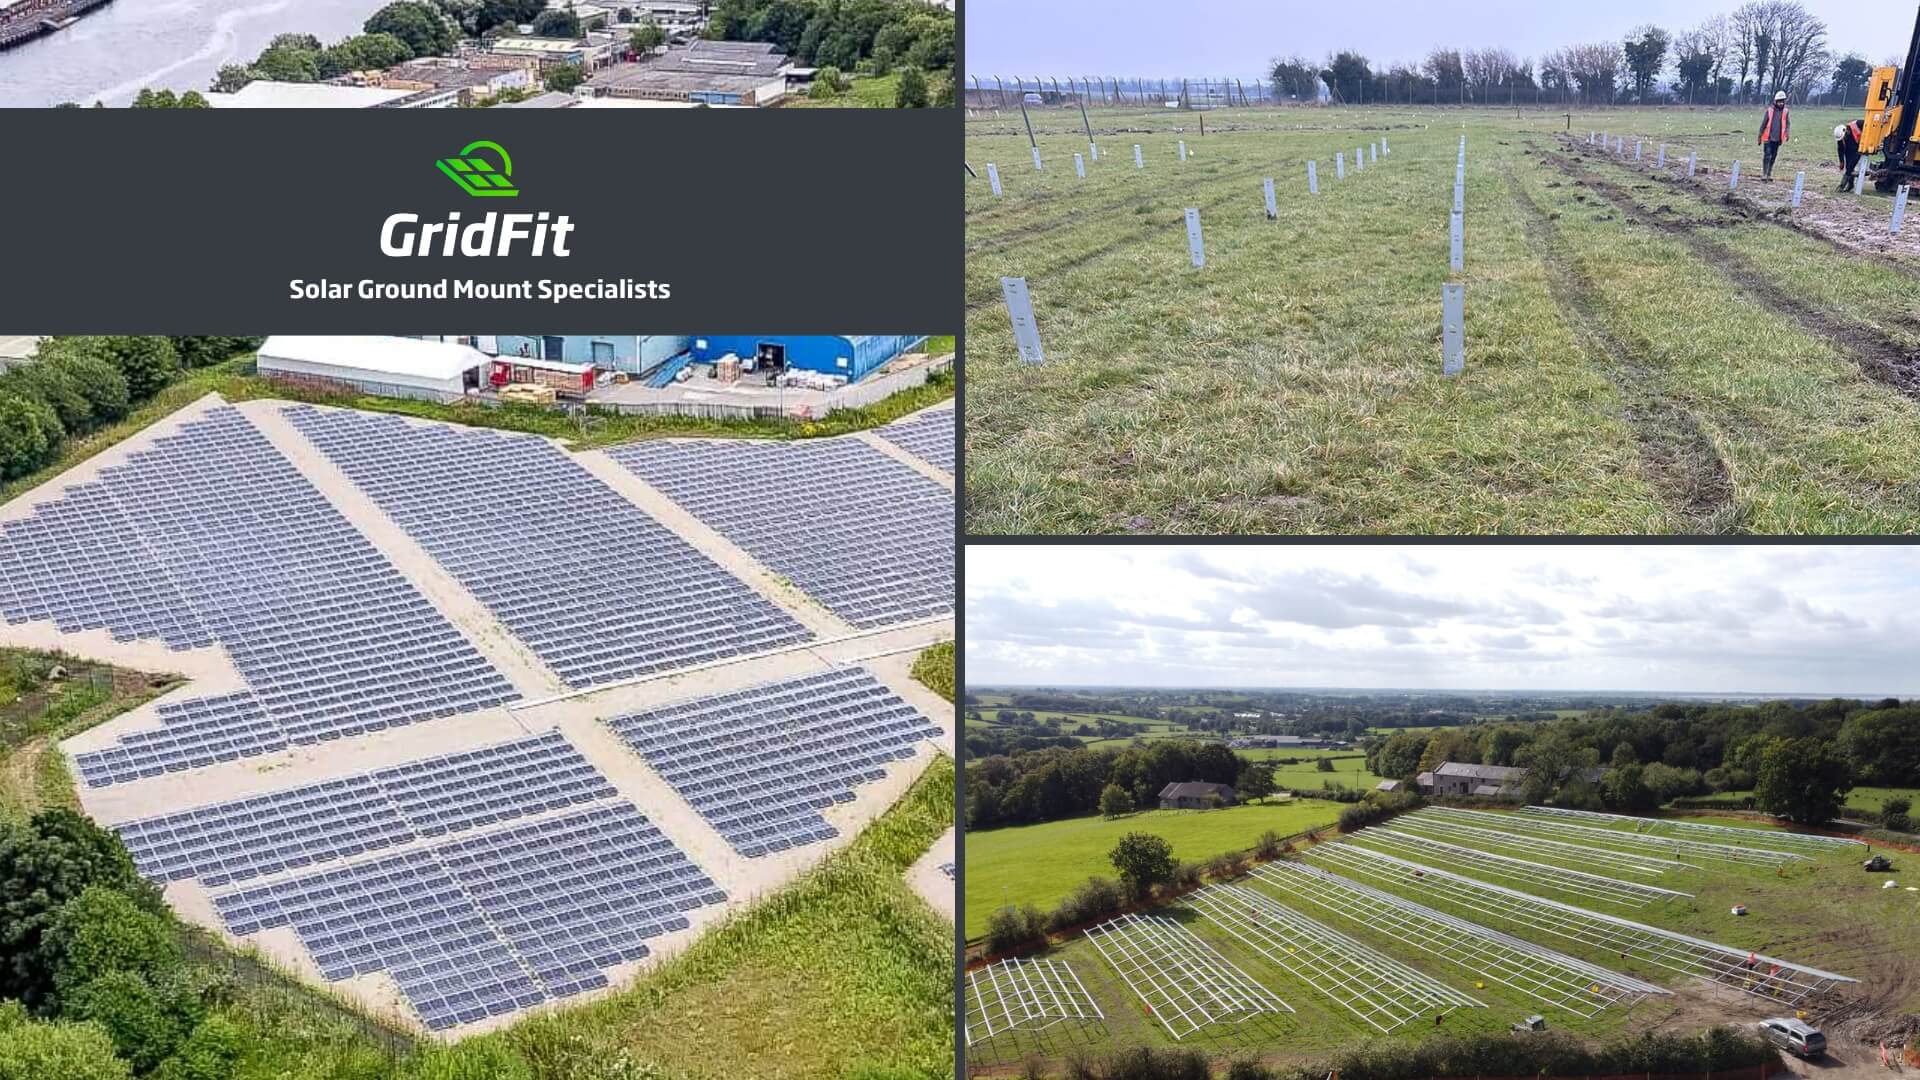
3. Stringing the Lines
Once the site is prepared, reference points are established using GPS markers, laser levels, or physical stakes to ensure precision in pile placement. High-tensile string or laser guides are then stretched between these points to serve as accurate guides for the foundation piles. This step ensures uniform row spacing, structural integrity, and efficient land use. The setup is carefully checked using surveying tools before pile driving begins to account for any necessary realignments.
4. Distributing the Piles
Foundation piles, typically steel posts, are then distributed across the site using bobcats, telehandlers, or cranes to facilitate efficient movement and positioning before installation begins.
5. Driving and Aligning the Piles
Using specialised machinery, the piles are driven deep into the ground to create a firm foundation. This step is crucial for ensuring the long-term durability of the system, as the piles must withstand environmental factors such as wind loads and soil movement. Various methods and equipment are used for pile driving, including:
- Hydraulic Pile Drivers – These machines use impact or vibratory methods to efficiently drive piles into the ground.
- Vibratory Hammers – Apply oscillations to facilitate pile penetration, often used in soft to medium soils.
- Screw Pile Drivers – Rotating heads drive helical piles into the ground, providing strong foundations with minimal ground disturbance.
Ensuring alignment is key to maintaining structural integrity. Traditional methods involve setting up string lines or laser levels, while modern pile drivers incorporate GPS technology for millimetre precision in pile placement.
6. Adding the uprights, rafters & purlins
Once the piles are installed in the ground to the desired depths, the heads of the piles are coated with a ZINC paint to stop any corrosion and rusting. Upon completion of piling, uprights are installed from the piles in the ground if required as per manufacturer specifications. Following on from the uprights rafters are installed following the required degree to allow optimum performance. Purlins are horizontal beams that connect the foundation piles and form the support structure for the solar panels. These are carefully installed to create a sturdy framework, allowing for efficient weight distribution and ease of panel mounting.
7. Installing the Panels and System Testing
Finally, the solar panels are securely mounted onto the purlins, connected to inverters, and integrated into the energy system. This is the stage where the solar array comes to life, ready to generate clean, renewable energy. However, before the system is fully operational, several tests and compliance checks must be carried out:
- Continuity Testing – Ensures all electrical connections are intact and there are no breaks in the wiring.
- Open Circuit Voltage (Voc) and Short Circuit Current (Isc) Measurements – Verify that the panels are producing the expected voltage and current under open and short circuit conditions.
- Insulation Resistance Testing – Assesses the quality of insulation to prevent electrical leaks, ensuring safety and system longevity.
- Irradiance Measurement – Measures the solar energy received at the site to correlate with the system’s performance.
Why Ground Mount Solar?
Ground mount solar systems are particularly well-suited for large commercial and utility-scale projects, offering advantages such as:
- Optimal Sun Exposure – Panels can be positioned for maximum energy generation.
- Scalability – Large systems can be deployed without roof space limitations.
- Accessibility for Maintenance – Easier access for cleaning and servicing compared to rooftop installations.
At Gridfit, we specialise in delivering high-performance ground mount solar solutions, ensuring efficiency, durability, and sustainability. From initial site assessment to final installation, we manage every step of the process to provide reliable and cost-effective renewable energy systems.
If you’re considering a ground mount solar project, get in touch with us to learn how we can help power your future with clean energy.

